Date of Trip: June 25th – 26th, 2016
Well I have been wanting to climb the beautiful west ridge of North Twin Sister in Washington for a while now. Some friends and I did a mission in April 2015 – the rock was dry but there was still some snow on the route which made route-finding a bit more challenging since most of the cairns/paths were hidden. The inclination with this scramble is to stay high and left on the ridge proper, which leads to more difficult class 5 scrambling. This slowed us down too much as it was also our first scramble of the year, so we didn’t make the summit. This year I heard a friend completed a traverse of both North Twin Sister AND South Twin Sister in a day, so that got us thinking…My partner Rob is always keen on doing traverses when possible to try to maximize peak bagging potential, so I started to entertain the idea. I talked to my friend and then tried to find some trip reports online, which were hard to find and I didn’t have a guidebook that detailed this route – I’m not even sure there is one so I hope this trip report is useful! 🙂 I do have the Matt Gunn Scrambles in Southwest BC book (seems to be out of print as I write this, but his website still has some useful updates on it) so I had good descriptions of the scrambling route up North Twin and South Twin, but no good guidebook descriptions of the middle part of the traverse. Based on discussions with my friend and the information that we could find, Rob and I decided to go for it! The key seemed to be to really pay attention to the route-finding and give ourselves as much daylight as possible. That’s exactly what we did!
Our rough plan: Arrive at the trailhead around dinner time on Saturday, bike/push mountain bikes up the first part of the trail, which is a logging road, to the North Twin Sister junction. Set up camp here and start hiking towards North Twin Sister as soon as the sun is up on Sunday. Complete the traverse and get back to the van before dark if possible. Woot woot!
Technical gear we brought for the traverse itself: ice axe, alpine harnesses, one 70m half rope, belay device, prussic, helmet, webbing, quick-links/rap rings, and a few cams/nuts. With this gear we could safely cross the glacier required to gain South Twin, as well as safely travel on any steep snow slopes on the mountains themselves – our understanding was that the snow slopes weren’t too steep and with the expected sun in the forecast we thought the snow would be soft enough that crampons wouldn’t be necessary. We could also set up a rappel and pitch-out short sections of the route if necessary. NOTE: this is not necessarily what you should bring. Depending on the time of year, conditions, your skill level/comfort level, etc. you may want to bring more or less technical gear.
♦ ♦ ♦ ♦
We left Vancouver BC on Saturday afternoon to arrive at the trailhead around 5pm I think it was. Now I am new to mountain biking, thus even though this part of the trail is not technical or too steep, I had trouble trying to ride my bike while wearing my overnight pack – it was too heavy and I don’t have the skill! Haha! I ended up pushing my bike up the road for the most part and because Rob is a machine he even pushed both bikes at times! We made it to the trail junction in just under 2.5 hours, which is roughly on par with what the book estimates. If you were to continue on this logging road instead, you would reach the end and thus the beginning of the trail to ascend South Twin. We set up camp and went to bed early.

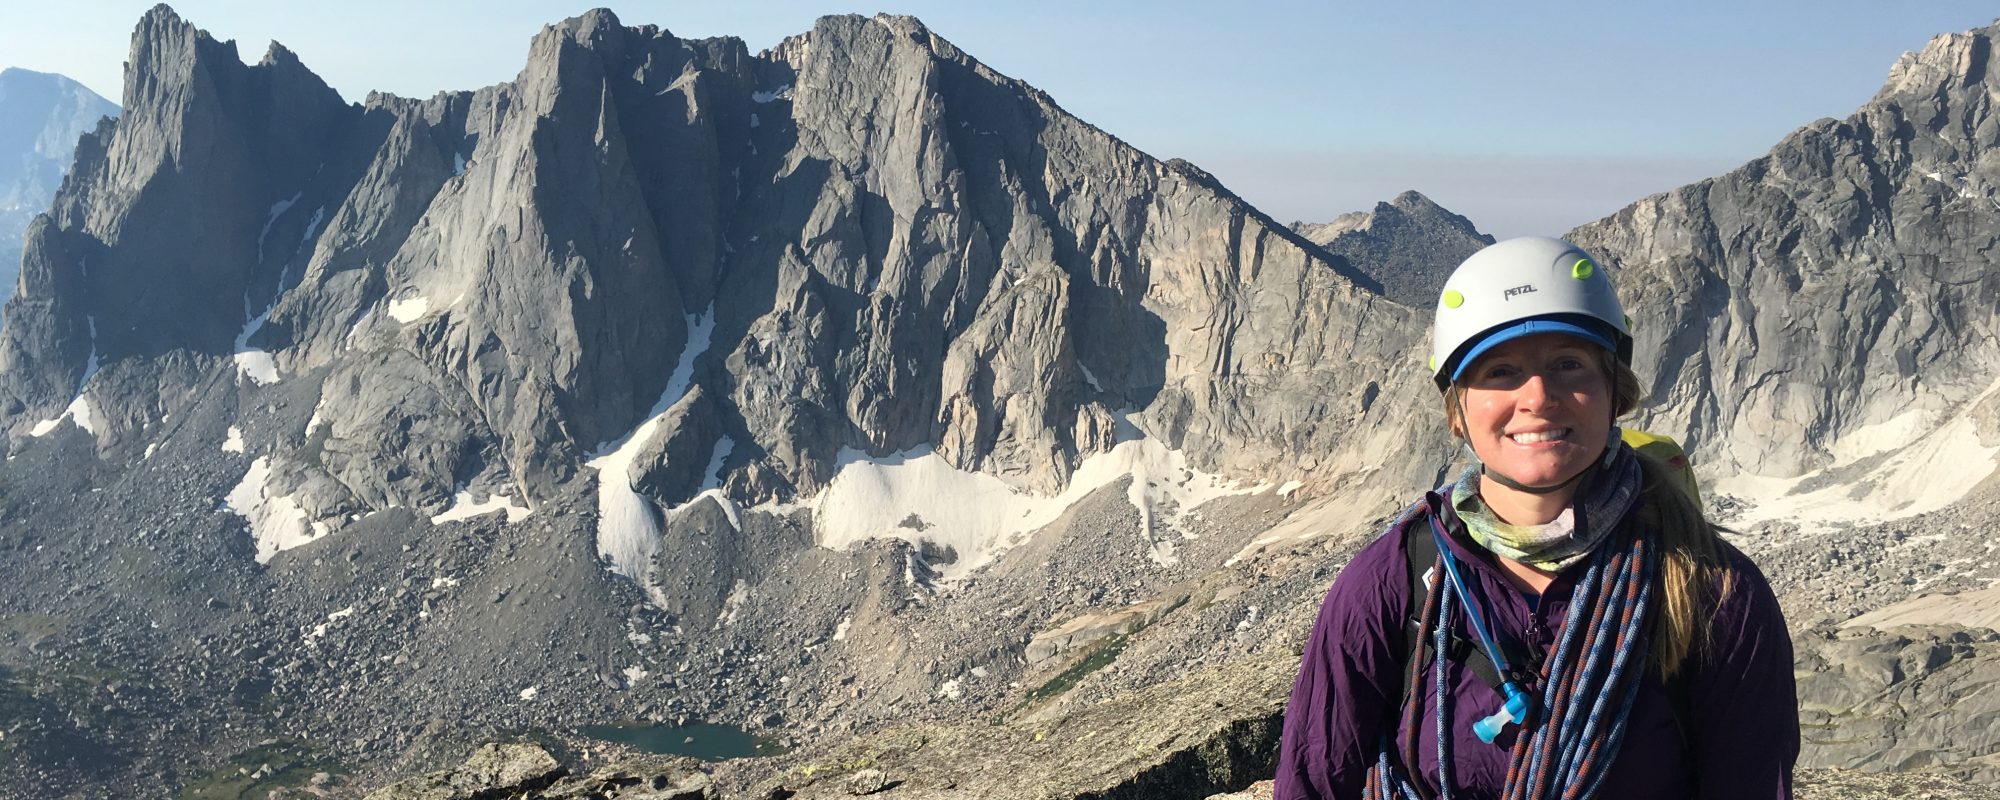
We woke up just over an hour before sunrise and started hiking at 5:30am. We gained the base of the west ridge quite quickly – the trail is much easier to follow when not covered in snow! Last year we got off route and ended up doing some annoying bushwhacking so this was much better. The west ridge is about 500m of beautiful, continuous scrambling. It’s definitely a lot of 4th class and it can easily get into 5th class if you’re not paying attention. The inclination (Get it?! 😉) is to stay left and high on the ridge but this is usually where the terrain would turn into 5th class – if you stay alert and keep looking for an easier way to the right, you’ll always find one. There are some cairns on route to help you out. We also used the mobile map app called OsmAnd – you can download the appropriate maps ahead of time and this app will still work when your phone is in airplane mode. There are many trails included on these maps – the west ridge of North Twin is but nothing else in the area is. This is another way to check if you’re on track (though keep in mind there can be more error when using a cell phone GPS compared to a Garmin GPS unit). It didn’t take us too long to figure out the way – we were on the summit of North Twin by 9:30am! Yeah!


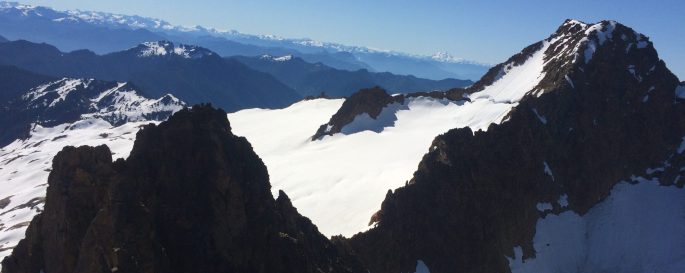
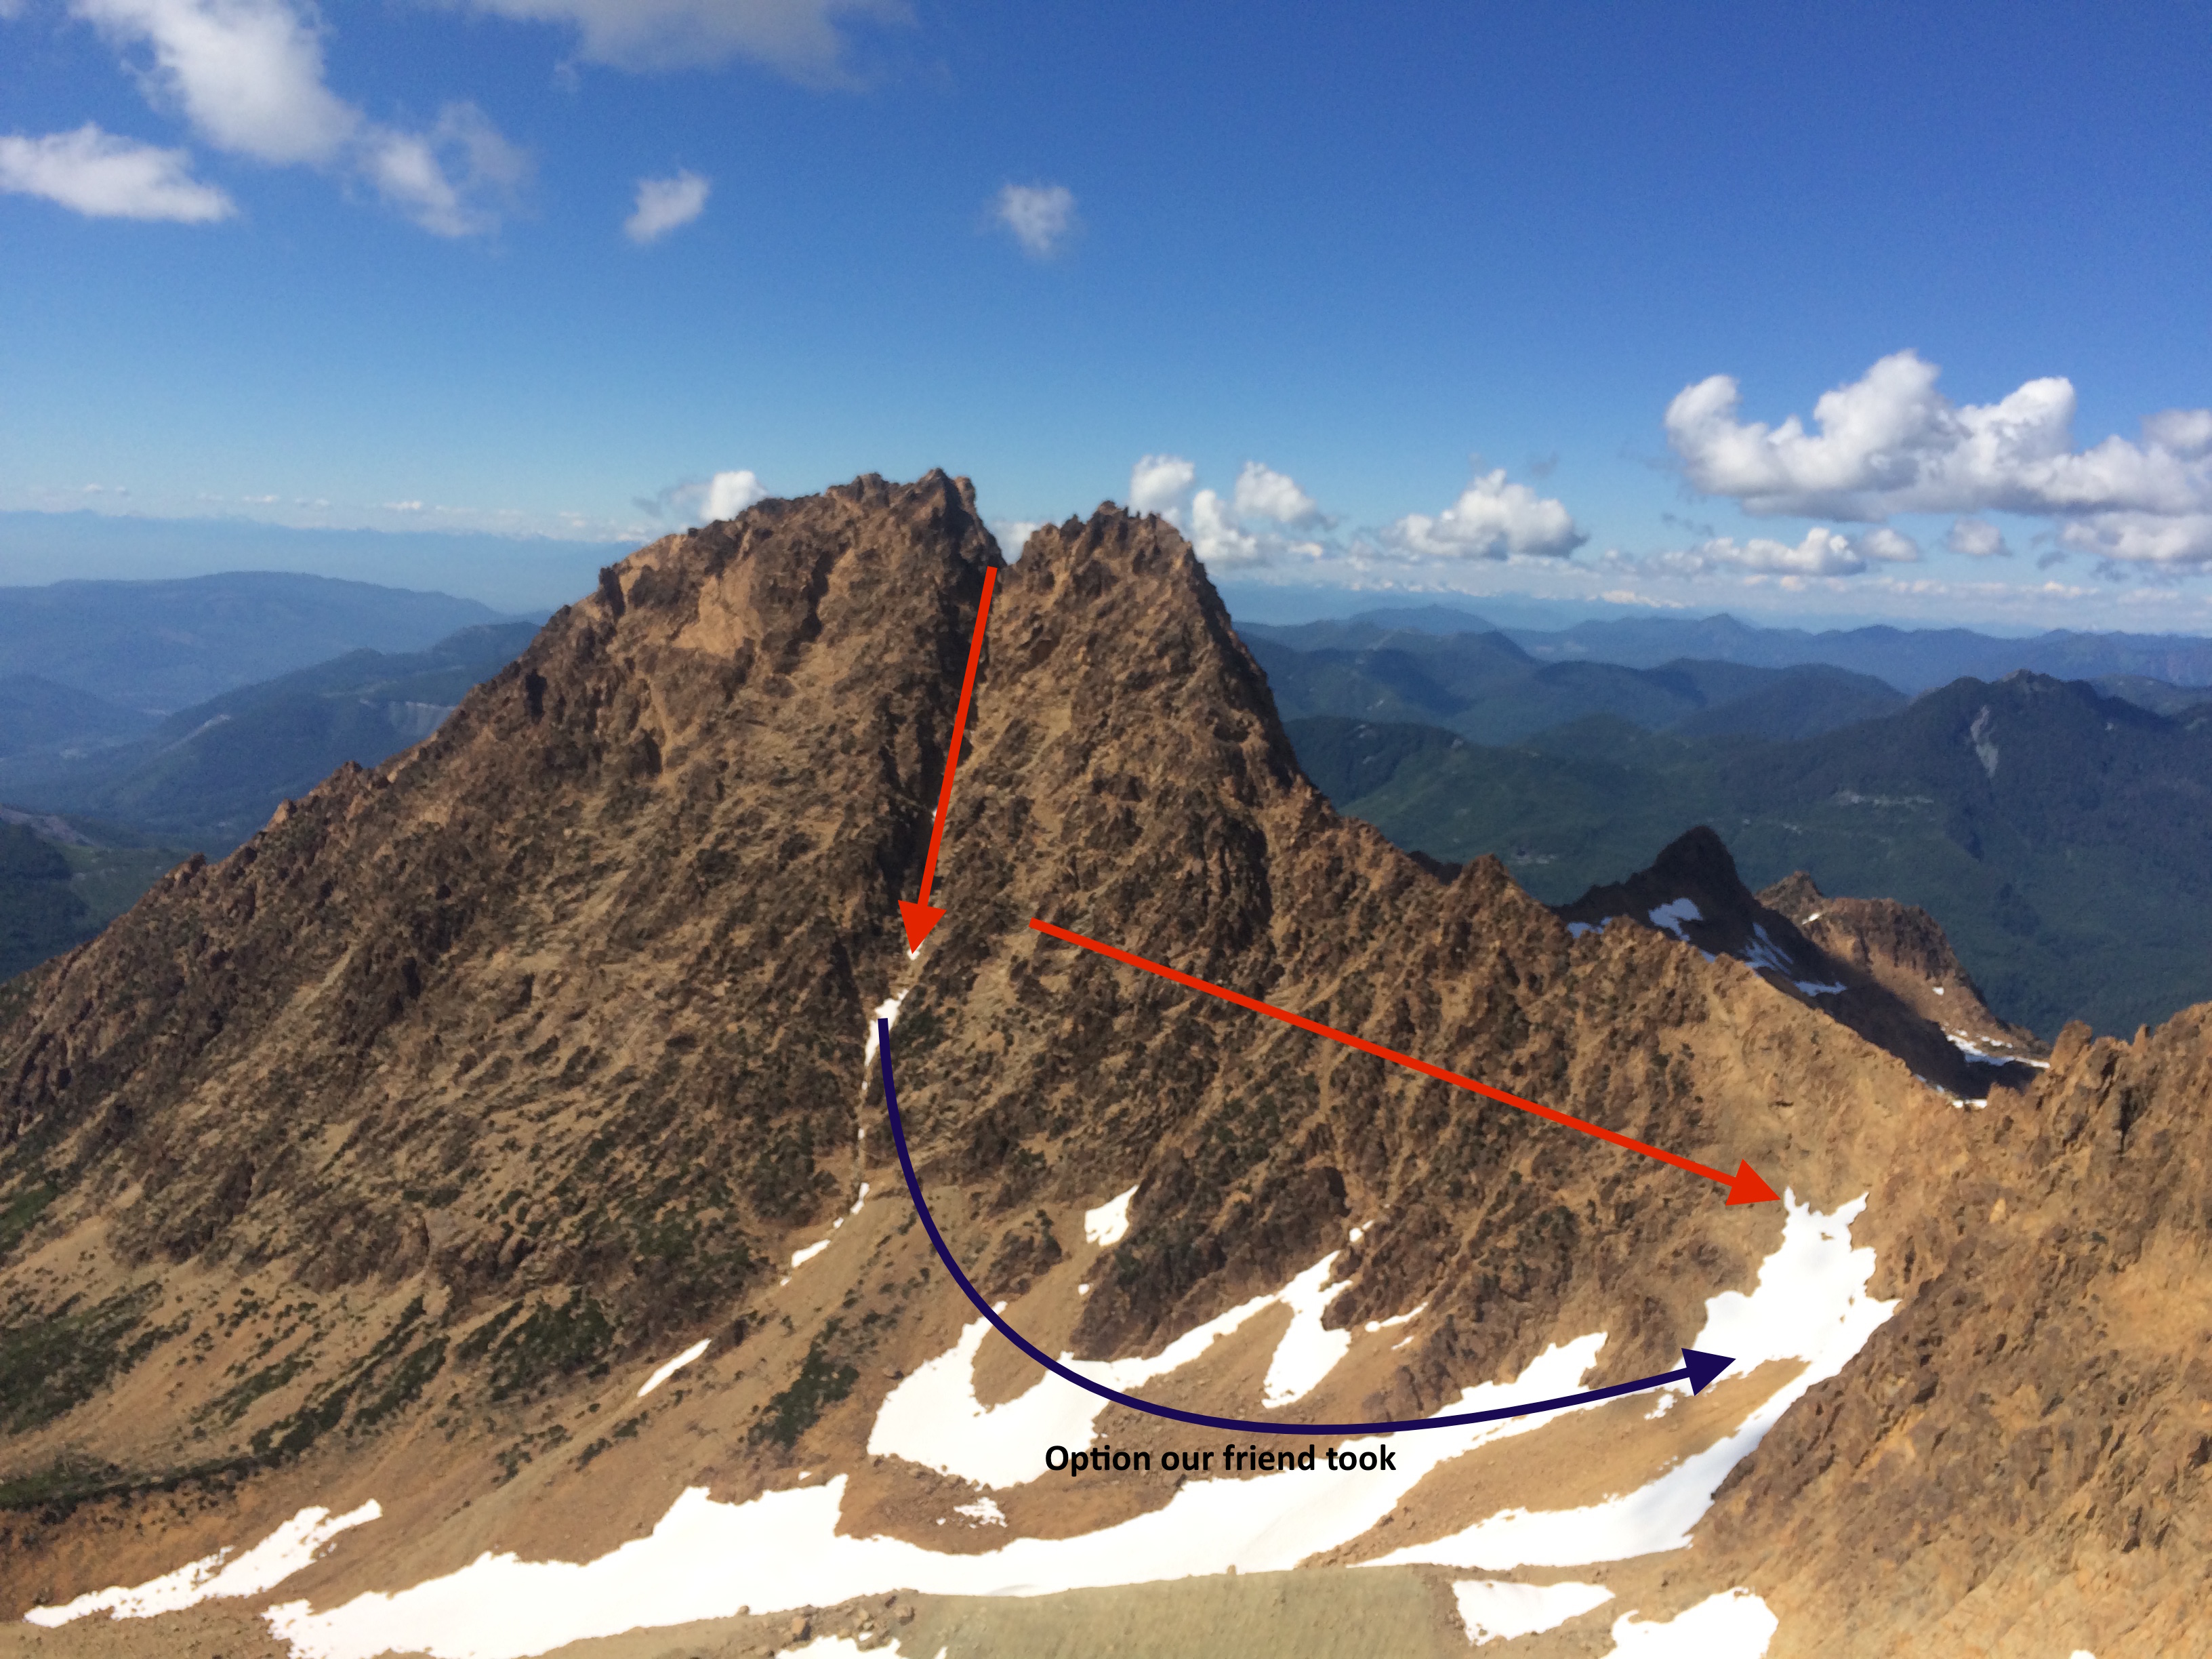
From the summit, we could get a good, high-level view of the rest of the route:
Looking down the main (southeast?) gully off the summit it looks like a chossy mess – and it is! Be very careful descending this gully – it’s a bit technical, there is a lot of loose rock, and it’s pretty steep. Once you start going down it, I’d stay you’re committed to continuing to go down it. We seemed to stay right for the most part. You’ll come across a rap station but examine the rap station and the surrounding hazards carefully – we felt it was safer to down-climb instead of rap, and did so right of the rap station. If you keep your eyes peeled you’ll see a good way to go. Our friend and her climbing partner descended all the way to the basin at the bottom of the gully and then walked up/left to the scramble that gains the col between the two peaks. We were able to find a way to stay pretty high and pick our way across on the rock, which continues to be 4th class scrambling. It took us 2 hours to get to the scramble that gains the col and in the end eventually lost a fair bit of the elevation we were trying to maintain. I think either option works depending on your comfort level/skill/speed – gaining the col is not too long of a scramble so looking down at the basin that option seemed like a good one, except for the prolonged scrambling down that loose gully. It might be quicker though. Here is a great place to decide whether to bail or continue. it’s easy to bail via the basin and out (once at the end of the basin you can connect with the South Twin trail), once you scramble to the col and cross the glacier, you can still turnaround and bail but I wouldn’t recommend bailing once you’ve already committed to scrambling up South Twin. The rock on that ridge is really loose and the rocks are a fair size so I’d focus on not spending too much time there. The scrambling is easier than on North Twin but still deserves lots of attention. Once we gained col we could see the footprints of our friend the weekend before! At this time of year, the glacier still had good coverage – snow bridges were strong and route finding simple. We could see where there were larger crevasses buried under the snow so later in the season you’d probably want crampons, especially if you were walking on bare ice. We crossed the glacier to gain the far ridge of South Twin pretty easily – the moat wasn’t any trouble.


It doesn’t take too long to gain South Twin from this side – we were on the summit by 2:30pm but still had quite a ways head of us.


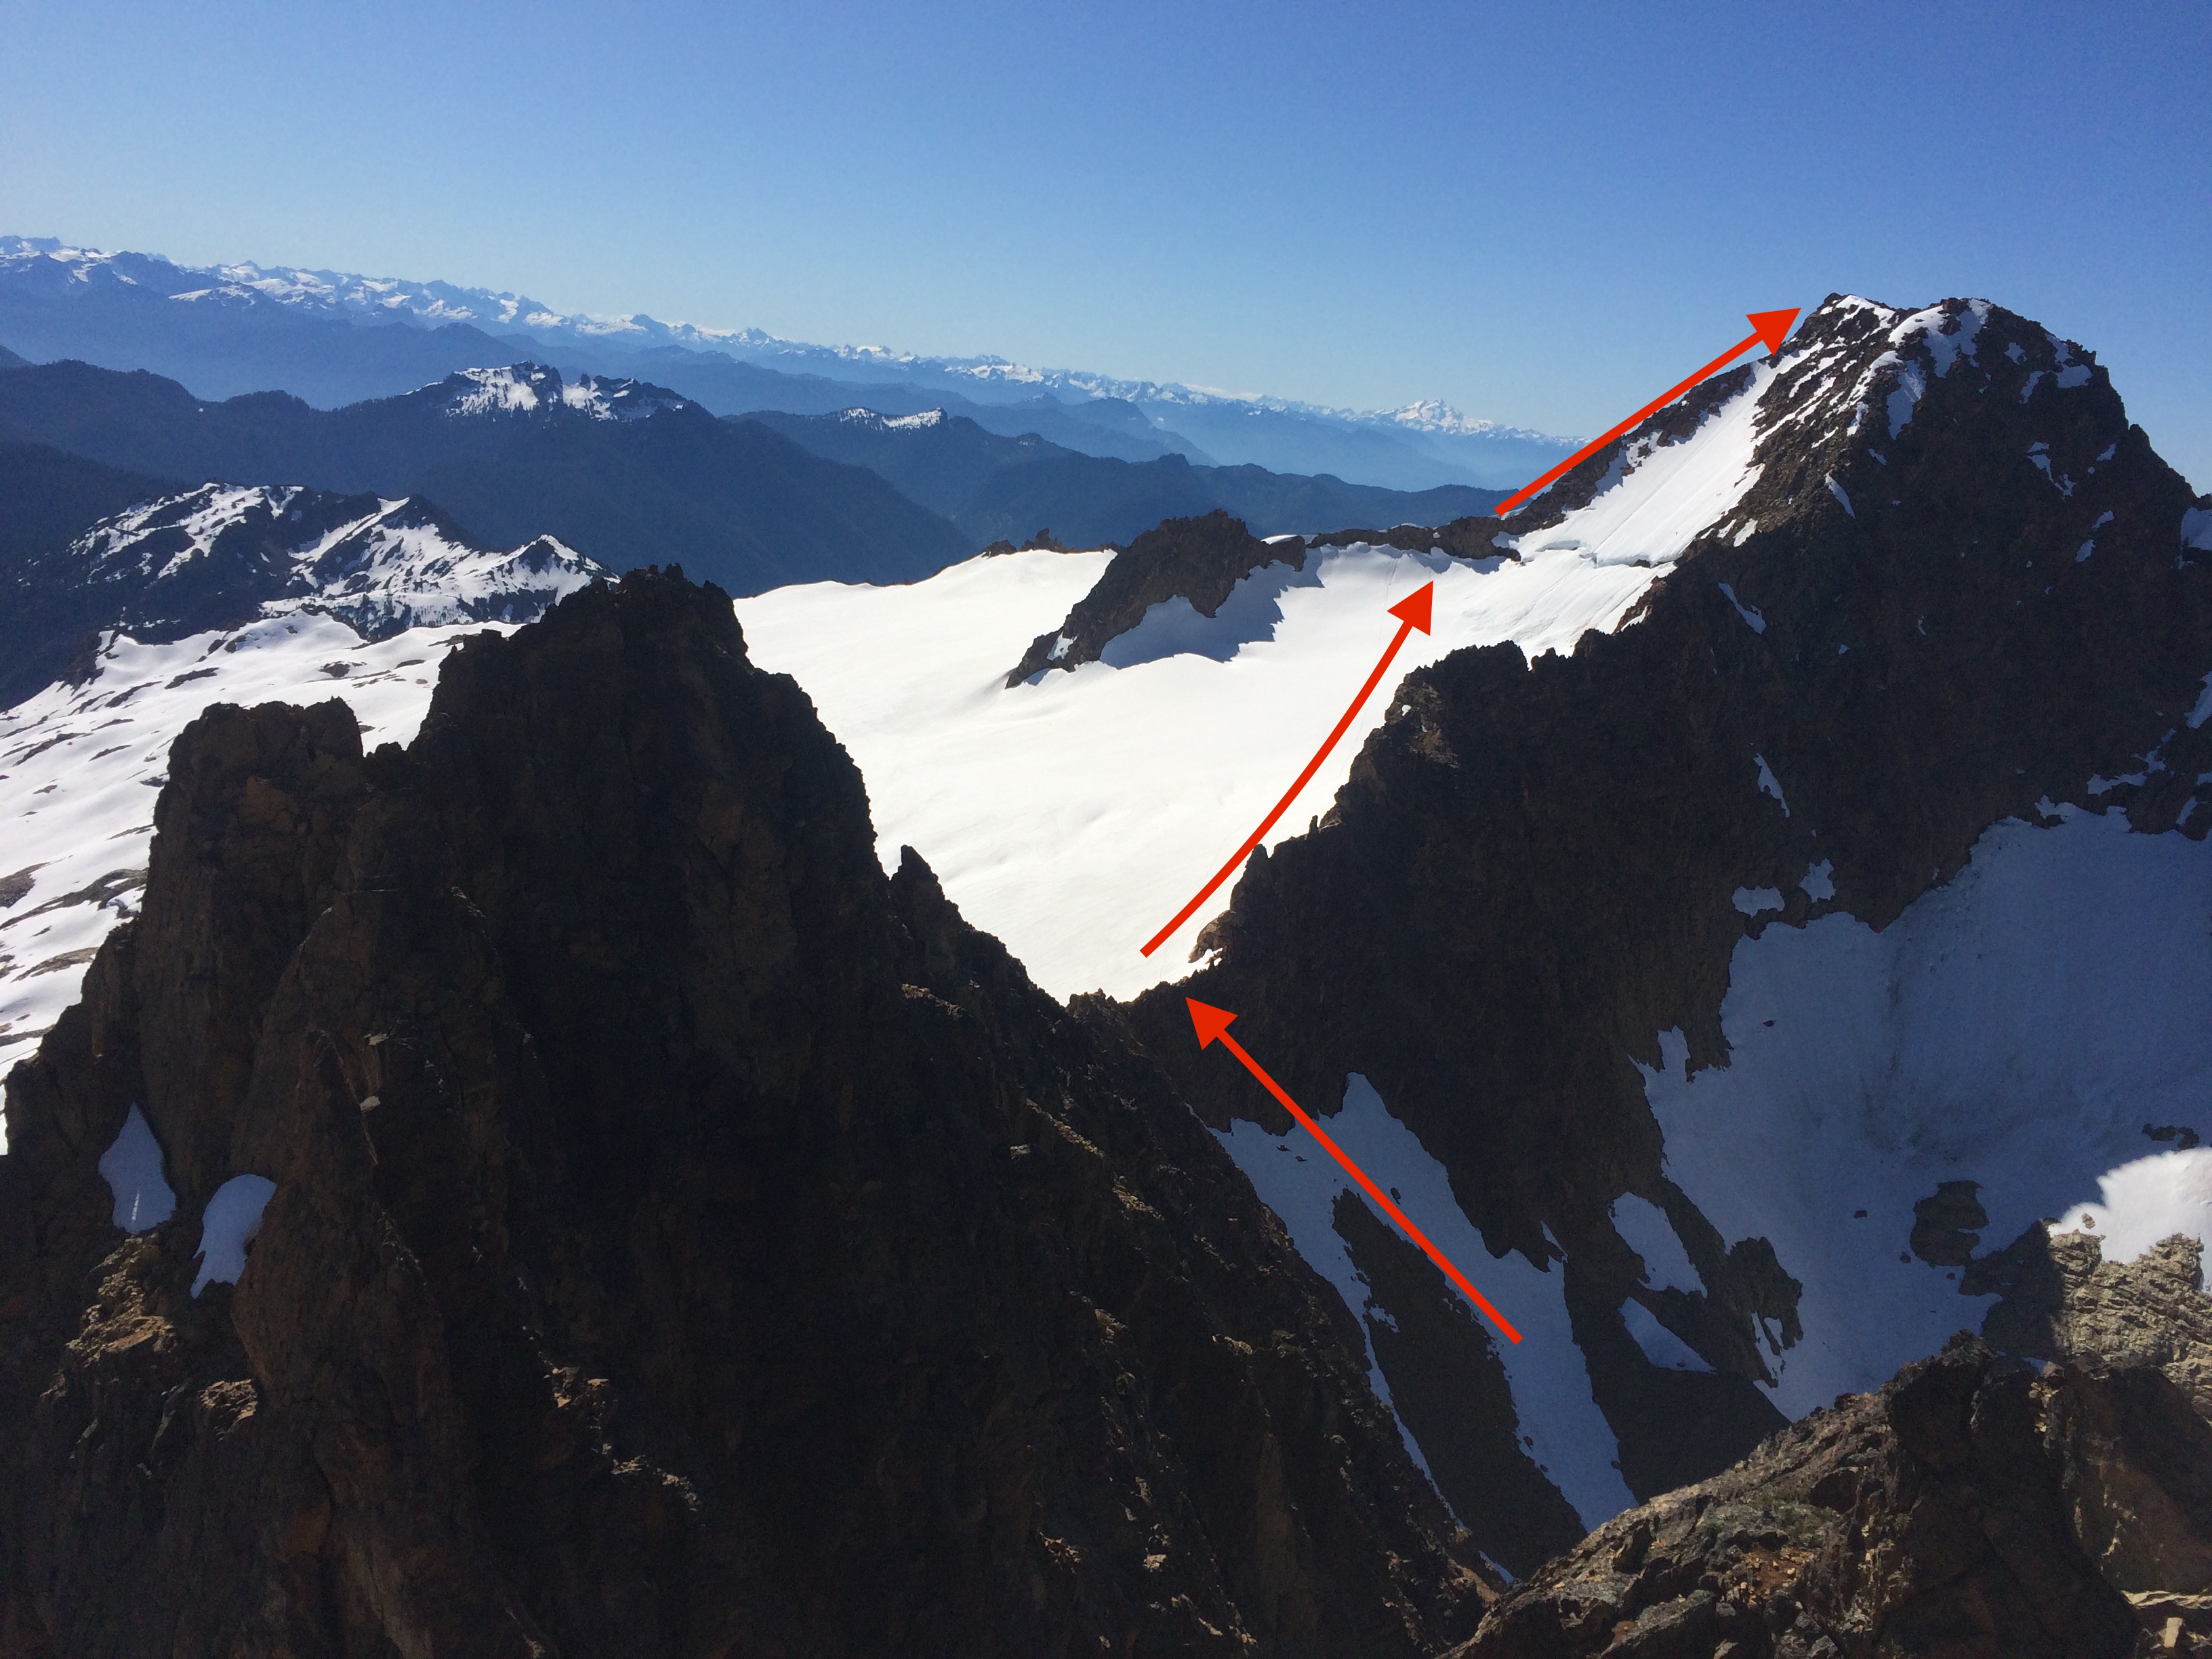
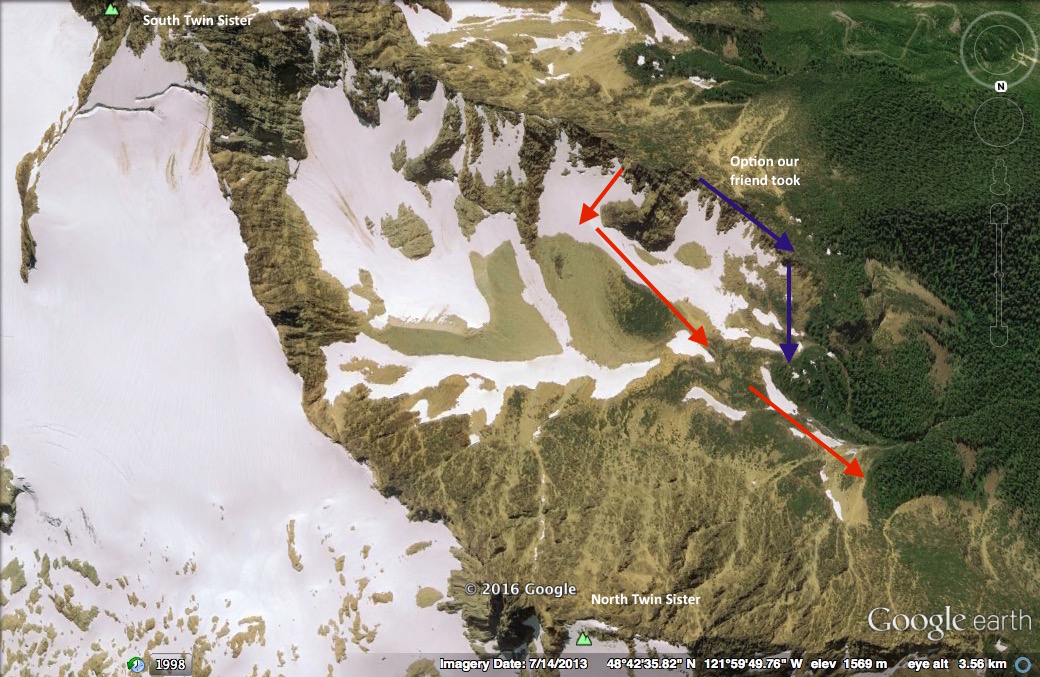
Looking back at North Twin from South Twin, here’s an idea of where to go:
Now we had heard that the scramble down from the summit of South Twin and back onto the trail could be challenging given that we hadn’t done it before – it’s not as well marked nor as well travelled as North Twin and it’s not on OsmAnd. We felt we hit the summit of South Twin at 2:30pm was in good time. After leaving the summit of South Twin, we stayed a little too high and right, so we got cliffed-out (We should have re-read Matt Gunn’s description of the ascent of South Twin!). Not knowing how far back we’d have to scramble to get back on route and we were sure we could see the route below, we decided to set up a rappel There was solid rock to rappel from and it was a good spot to pull the rope without worrying about it getting snagged. If you get off route like we did you’ll probably come across our green webbing. 😀 Once we rappelled we soon found some cairns to help guide the way – there weren’t very many but still enough to be useful. The scrambling down from South Twin was easier than the scrambling we had done earlier in the day (lots of 3rd with some 4th class) but it still required being alert. After scrambling for what felt like forever and still having what seemed to be quite a way to go (this ridge is LONG), decided to try to find a way off the ridge sooner. I don’t know how to describe exactly where we left the ridge but there were some ledges to down-climb and a relatively steep snow slope to gain the basin below. I’m not sure if this route would be in if there wasn’t any snow, but it was definitely faster than continuing to scramble along the ridge – when we looked back up at the ridge we realized we did still have a way to go! If you can’t find a way off the ridge sooner, the standard descent described in Matt Gunn’s book (what our friend did) follows the ridge literally all the way to the end where it hit some trees and the down-climbing becomes easier. Now I’d say the trickiest (with respect to route-finding on the decent of South Twin) is finding the trail from the basin. Depending on whether you hop off the ridge earlier or later will affect how you find this trail. Basically, as you descend beyond the basin and the end of the ridge, you’ll see a creek running parallel to the ridge of South Twin if it kept going (on your right or left depending where you descend) – you need to be on the right side of this creek. Basically walk right and towards/parallel to a ridge flanking North Twin above. You’ll cross what’s kind of an open field towards some trees (I think you’ll by-pass an opening in the trees on the left, don’t go down here) – on the edge of these trees you’ll hopefully see one or two small cairns (you may not see them until you’re up close). The trail is barely visible but it is there. Do not try to find it in the dark! Enter the trees and if you don’t find a very faint trail, hike back out and try another way right next to it. Once you find this trail it will lead you to a boulder field. This boulder field is a little confusing and not marked either, but basically keep following it down and trending right until you reach the bottom of it. At the bottom of the boulder field you’ll enter the trees again on a faint trail (I think there was a little bit of flagging tape this time but I wouldn’t rely on that). We periodically looked at OsmAnd to see if we were still trending toward the end of the logging road, to which the trail connects. Once in the forest the trail continues down and trending right but eventually the decline is very minimal if even there at all. This trail eventually turns to a combination of regular trail and a gravel trail (as perhaps an extension of the logging road at one point a very long time ago) but there is a lot of vegetation extending onto the trail with no flagging so it plays with your head a bit. The trail continues in this manner for a while until it eventually connects with the logging road! Once back onto the logging road there’s still a bit of walking to get back to the junction for North Twin but it’s not too far. There are some forks in the road and I believe there are two ways back to the North Twin junction, but there could be other forks I don’t remember – having a GPS would be helpful. We arrived back to camp in about 15 hours (so approximately 8:30pm) – we were so glad we had to bikes to cruise the rest of the way down! It’s didn’t take us long to pack up camp and then the ride back to the van took less than an hour so we made it back before dark!


All in all, a very successful trip! I highly recommend this trip, but it is for experienced, competent scramblers with good fitness only. I also recommend avoiding trying to find your way off South Twin and onto the trail back to the logging road in the dark – our friend got caught doing that unfortunately and it gave them a lot of trouble. I wish I had more pictures of the descent to share – I’ve tried to outline it here with Google Earth, but I’m not sure how accurate it is:
My key takeaways: I was nervous to embark on a trip with this much scrambling – I had never done that much advanced scrambling before and it can be quite physically demanding. It was challenging but I felt much better than I thought I would, which I find it often the case! 🙂 I was also nervous about all the route-finding but we did it! Rob and I kept an open two-way dialogue the entire trip, discussing terrain assessment, risk, how we each were feeling – I think this can make a huge difference when on a more challenging trip.
Do you have any questions about this trip or general comments/updates to add? Leave a comment below!
Keep on rockin’ 🗻
J.
